Nurture your child’s curiosity by introducing simple science experiments! Science experiments give toddlers and preschoolers the opportunity to explore and learn in new ways. It also allows them to learn about new topics in the world around them.
Since we are in the season of winter, it is easy and fun to incorporate basic lessons about the season when doing science experiments with your child at home and in a hands-on way. Some can be done indoors, while others can be taken outdoors to utilize the chilly temperatures as a tool for teaching. But, you will not need real snow to participate in any of them. In fact, you can even create your own!
These experiments will help answer questions like; how do animals stay warm in winter? Why does your breath freeze in the cold? What happens to water when it gets cold?
The teachers at Children’s Learning Centers of Fairfield County (CLC) are sharing experiments they love doing with students in the classroom, that can also be done at home. We are also sharing experiments from CLC’s Play to Learn Book. Find a list of materials and steps for each, below. Many of these experiments only require a few materials.
Make Snow Inside
Make snow with your child INSIDE! They will be thrilled to see how a couple of basic ingredients create a pile of snow that they can play with on the table or inside a bin. They will not even have to worry about it melting! Best of all, you will only need two ingredients and this activity will result in hours of play time.
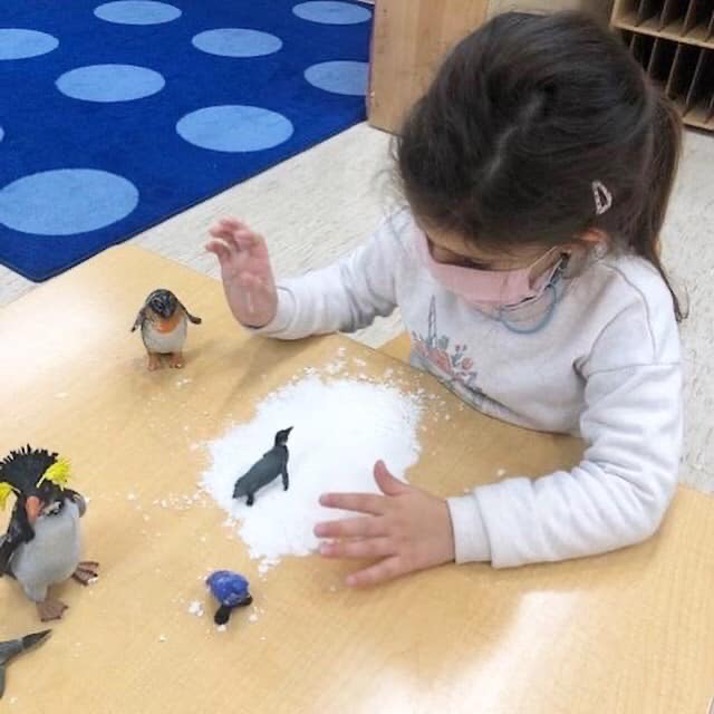
Materials:
- 3 cups of baking soda
- ½ cup of white hair conditioner
Instructions:
- Combine the baking soda and white hair conditioner.
- Let your child explore in their pile of snow! Let them create igloos, snow angels or even get little cars and other figures to play with in the snow. The possibilities are endless!
Talk to your child about what they like to do in the snow and why. Ask them how the snow they created feels and how it looks. How does it compare to the snow they play with outside? What is the same? What is different?
Is your child learning their letters? Spread the snow out on the table and ask them trace letters with their finger!
Blubber Experiment
Teach your child how animals with blubber stay warm even in the icy ocean water, using a simple science experiment!
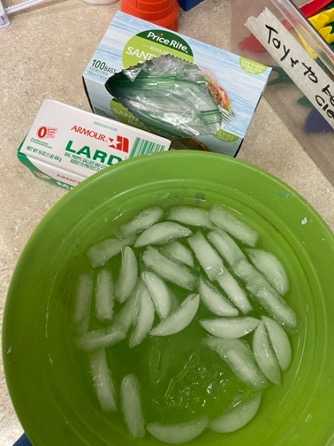
Materials:
- Plastic baggies
- Lard
- Bowl of ice water
Instructions:
- Put the lard in one baggie.
- Place your child’s hand in a clean baggie and put it into the ice water for a couple of seconds.
- Then place your child’s hand inside the baggie with lard and put it into the ice water for a couple of seconds.
- Ask your child what difference they felt between the two times they put their hands in the water.
- Explain to your child that when they placed their hand with the “blubber” in the ice water it stayed warm. People wear warm clothes to stay warm in the winter but animals don’t wear clothes, they have blubber, and that’s how they stay warm even in icy cold water!
After doing this experiment, read books about and look at photos of animals that live in cold climates and have blubber to keep them warm! Seals, whales and walruses are great examples of animals that have blubber to keep them warm in cold water!
Freeze Your Breath
Head outside for this science experiment… or just to your kitchen freezer! This experiment will teach your child about why their breath freezes in the winter and what they observe when it happens.
Materials:
- Drinking glass
- Magnifying glass
- Paper towel
Instructions:
- Put the drinking glass outside (if the temperature is below freezing) or in the freezer. Leave it there for about 15 minutes.
- Pick up the glass. Bring it close to your mouth and blow your hot breath onto the glass.
- Ask your child to look at the glass and tell you what they see. (There should be frost on the glass).
- Look at the frost through the magnifying glass. Ask your child what they see now. Can they see anything they didn’t see before?
- Go inside and put the glass on a paper towel. Check it every few minutes. You will see the frost melting into water and dripping down the glass. Ask you child what they are seeing.
If the temperature outside is below freezing, it is also fun to put coats on and go outside to let children experiment with their breath. Ask them what they notice. Does their breath freeze into clouds? Ask your child about animals. Does your child think that animal breath freezes in the cold weather?
Melting Away
Teach your child about what happens to their breath in the wintertime. You can head outside for this activity, or to the kitchen freezer!
Materials:
- Non-paper plate
- Several sheets of dark paper
- Various frozen substances including: ice cubes, snow, freezer frost, ice cream and popsicles
- Magnifying glass
Instructions:
- Place a non-paper plate on a table in a warm place.
- Put a sheet of dark paper on the plate.
- Put any frozen object on the dark paper.
- Watch what happens to the object by looking through a magnifying glass. Ask your child what changes they see.
- Remove the paper and throw it away when the object has melted. Place a new paper on the plate. Repeat steps 3 – 4 with a different item.
- Repeat the steps as many times as you like and watch different things melt.
If you live somewhere with snow, help children catch snowflakes on dark paper. Look at the snowflakes with the magnifying glass before bringing them indoors to melt. Ask your child how the object were each alike and different in this activity. Ask them what caused the frozen items to melt.
Trapped in Ice
Freeze small toys into blocks of ice and create hours of fun. This will also show your child what makes things freeze and melt, as well as what water looks like as a liquid and as a solid.
Materials:
- Small waterproof toys or object like plastic animals, marbles, shells buttons and blocks
- Re-sealable plastic bags of any size
- Water
- Your kitchen freezer
- Baking pan or tray with raised edges
Instructions:
- Put the small waterproof toys or objects into re-sealable plastic bags. Let your child put many objects in one bag or decide to put one in many bags. Encourage them to group the objects in different ways. For example, by color or size.
- Fill each bag two-thirds of the way with water.
- Squeeze out as much air as possible in order to tightly close each bag.
- Place the sealed bags in the freezer. Leave them in the freezer for several hours, until the water is frozen solid. Overnight might work best!
- Remove the bags from the freezer. Hold he bags under running warm water for 10 – 15 seconds to loosen the ice block inside.
- Show your child the bag. Ask them what they notice now that the water turned solid. What happened to the toys inside? How about what happened to the toys? Encourage children to touch the ice and describe how it feels.
- Open the bags. Slide the ice blocks onto a baking pan.
- Ask your child to free the objects from the ice blocks! How can they do it? Be sure they have adult supervision and they can scrape the ice with a spoon, hit it with an object or let the ice melt!
For some extra fun and a little competition, turn it into a race. Have each sibling or friend freeze the same type of object and see who can free theirs first! Whoever wins can be named the Ice Master and wins the game!
All of these winter science experiments will teach your child a little bit about what happens in nature during the winter and why! These science experiments will also help your child talk about what they see and feel in the winter, keeping their curious minds engaged and learning.
Even after your experiments are over, they provide an opportunity to continue talking to your child about the winter season. When you head outside, ask them how they feel. What do they like about winter? What do they dislike? When they go outside, what do they see?
For more fun activities like these, order CLC’s Play to Learn Book.
Children’s Learning Centers of Fairfield County (CLC) is committed to providing early childhood education for all families, with direct services and programs focused in health, nutrition & family support for children aged 6 weeks – 5 years of age. Find more information about enrollment, here!