Whether you are spending the weekend at home or looking for an after school activity, paper crafts are a great activity option for your toddler, preschool or elementary school student!
Many paper crafts require few supplies (most are supplies that you probably already have around the house) and the instructions are simple to follow. They are also a great opportunity to allow your child’s imagination run wild while they work to improve their fine motor and other skills.
These crafts are also great if you are looking for fun ways to incorporate your child’s creativity into their bedroom or playroom décor because you can easily hang them up once the project is complete!
Creating a theme for your child’s craft projects, especially when doing several in one day, will also allow you to have conversations with them on a topic. Seasons are often a great topic of conversation for children.
We are sharing some of our favorite paper crafts for winter. Some are projects that the teachers at Children’s Learning Centers of Fairfield County (CLC) are doing in the classroom with students! Others are included in CLC’s Play to Learn Book! All are fun and easy to replicate at home.
Lacing Mittens:
Having your child use their hands to trace and then lace paper mittens is a fun way to practice fine motor skills!
Materials
- Construction paper or cardboard
- Pencil
- Safety scissors
- Single hole punch
- 3-foot piece of yarn
- Marking tape
Instructions
- Put your construction paper or cardboard on the table. Put your child’s hand on the paper, palm down. Keep the fingers together and let the thumb stick out.
- You or your child can draw around their hand to create the outline of a mitten.
- Use safety scissors to cut out the mitten shape. Be sure to have an adult help with this step!
- Repeat steps 1-3 with the opposite hand.
- Punch holes around the mitten’s edges. The exact distance between the holes does not matter.
- Wrap a piece of masking tape around one end of the yarn. This makes it easier to poke through the holes.
- Start at the bottom of the mitten. Poke the yarn down through one hole, up through the next and so on. Continue all the way around the mitten.
- When all the holes are laced, tie the yarn ends in a bow. Trim the ends, and your mittens are done!
This is a good activity if your child is learning how to tie their shoes. You can show them how to tie the bow at the end and have them try to do it also, before trimming the ends.
Use this as an opportunity to talk to your child about the clothes we wear in the winter! Mittens are one type of winter clothing, ask them what some others are. Ask them why it is important to wear winter clothes when you go outside and which of their winter clothes is their favorite!
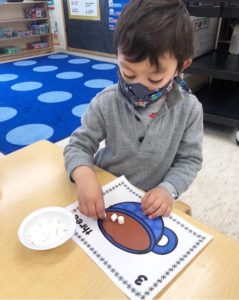
Add Marshmallows to Your Hot Chocolate:
Teach your child math while creating a little masterpiece and their own paper cup of hot chocolate!
Materials:
- Bowl of marshmallows
- Draw a cup of hot chocolate on a piece of paper and put a number in the corner
- Glue
- Crayons or markers
Instructions:
- Give your child the bowl of marshmallows and piece of paper with the hot chocolate and number drawn on them.
- Ask your child to tell you what number is on the paper.
- Ask your child to count out the number of marshmallows that go into their hot chocolate to match the number on the paper.
- Help your child glue the marshmallows to the hot chocolate.
- Ask your child to color in their hot chocolate with crayons or markers!
Once your child is finished with their cup of hot chocolate, ask them to count how many marshmallows are left in the bowl!
Ask them to describe the mug of hot chocolate they colored. What colors did they choose to use and why?
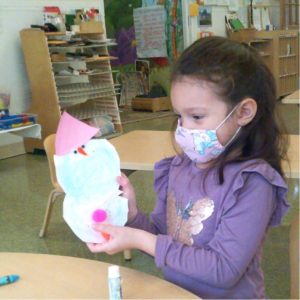
Paper Snow People
Let your child create their own snow people, even if there is not any snow on the ground outside! Best of all, they will not ever melt!
Materials:
- White paper
- Construction paper
- Crayons
- Tape
- Glue
- Safety scissors
- Any odds and ends for added features like a hat, scarf, arms, eyes and buttons.
Instructions:
- Copy different size circle shapes onto paper.
- Use safety scissors to cut them out to make the snow person.
- Tape or glue the circles together to put your child’s snow person together.
- Have your child color their snow person and glue on any features they’d like to add! Remember eyes, nose, mouth, hat scarf and arms!
Ask your child about their snow person. What features did they add?
Paper Plate Snowflakes
If you are interested in adding some winter decorations to your child’s room or to the playroom, paper plate snowflakes are the perfect option. Not to mention they are fun to make!
Materials:
- Thin, white paper plates
- Safety scissors
- Hole punch
- Yarn
Instructions:
- Fold a paper plate to make two halves.
- Fold the paper plate in half again to make a cone shape.
- Have your child use safety scissors to cut away parts of the plate. Any small cut is great! Do not cut all the folded edges since these edges hold everything together.
- Unfold the paper plate to see the finished snowflake!
- Repeat steps 1 – 4 with other paper plates to make more snowflakes.
- Punch a hole through each snowflake. String a piece of yarn through each hole and tie the ends together.
- Hang the snowflakes in the room of your choice! Hanging them from the ceiling is a really exciting option!
Paper plate snowflakes are a perfect opportunity to talk to your children about nature. In nature, no two snowflakes are the same, just the same as their snowflakes will each look a little different.
You can also use the paper snowflakes to talk to your child about how snowflakes are symmetrical, meaning they are made of repeating parts. Ask your child how many of the same parts their paper snowflakes have and encourage your child to talk about the patterns in their snowflakes.
Even ask your child to describe a real snowflake. What do they feel like? What do they look like?
Snow Paint
Make snow paint and create a winter picture of what a snowy day looks like!
One of our classes at CLC enjoyed reading the book, “The Snowy Day,” by Ezra Jack Keats and then they talked about how the children in the story were making snowballs, igloos, snowmen and were going sledding. Students then created their own winter scene with paint. They got to use brushes of different sizes, sponges and even some glitter to show what they love to do outside in the winter time!
Materials:
- ½ cup of salt
- ½ cup of white flour
- ½ cup of water
- Mixing bowl
- Mixing spoon
- Paint brush
- Small sponge
- Dark construction paper
- Acrylic paint (optional)
- Squeeze bottle (optional)
Instructions:
- Measure the salt, flour and water. Then pour into a mixing bowl.
- Stir well with the mixing spoon to make a thick paste.
- Use a paint brush, small sponge or both to paint with the snow paint on a dark piece of construction paper.
- Allow your snow picture to dry.
- Use other colors of the acrylic paint to add finishing touches!
To make the snow paint look different, thin it with water and put it into a squeeze bottle. Let your child squeeze the paint onto the paper! Ask your child to talk to you about the picture they are creating as they work.
Use this project as an opportunity to talk to your child about real snow. Explain that snow is made of tiny pieces of ice. The ice reflects light and colors. When many colors reflect at the same time, we see white. Ask our child to describe the sparkling snow. Can they see any colors in the sparkles?
Start a Craft Drawer or Bin
If you want to do more crafts like these, start a craft drawer or bin at home. That way, you will have supplies on hand when you and your child are ready to start a new project! Make sure to have construction paper, paint, paint brushes, crayons, markers, buttons, pom poms, ribbon, squeeze bottles, and any other items that your child likes to use when doing art projects.
For more fun activities like these, order CLC’s Play to Learn Book.
Children’s Learning Centers of Fairfield County (CLC) is committed to providing early childhood education for all families, with direct services and programs focused in health, nutrition & family support for children aged 6 weeks – 5 years of age. Find more information about enrollment, here!